
Customizing your QuickBooks Online invoice templates
There are now additional options to customize your invoices in QuickBooks Online.
From the invoice, select customize on the bottom tab:

You can choose a colour scheme that works with your brand, upload your logo
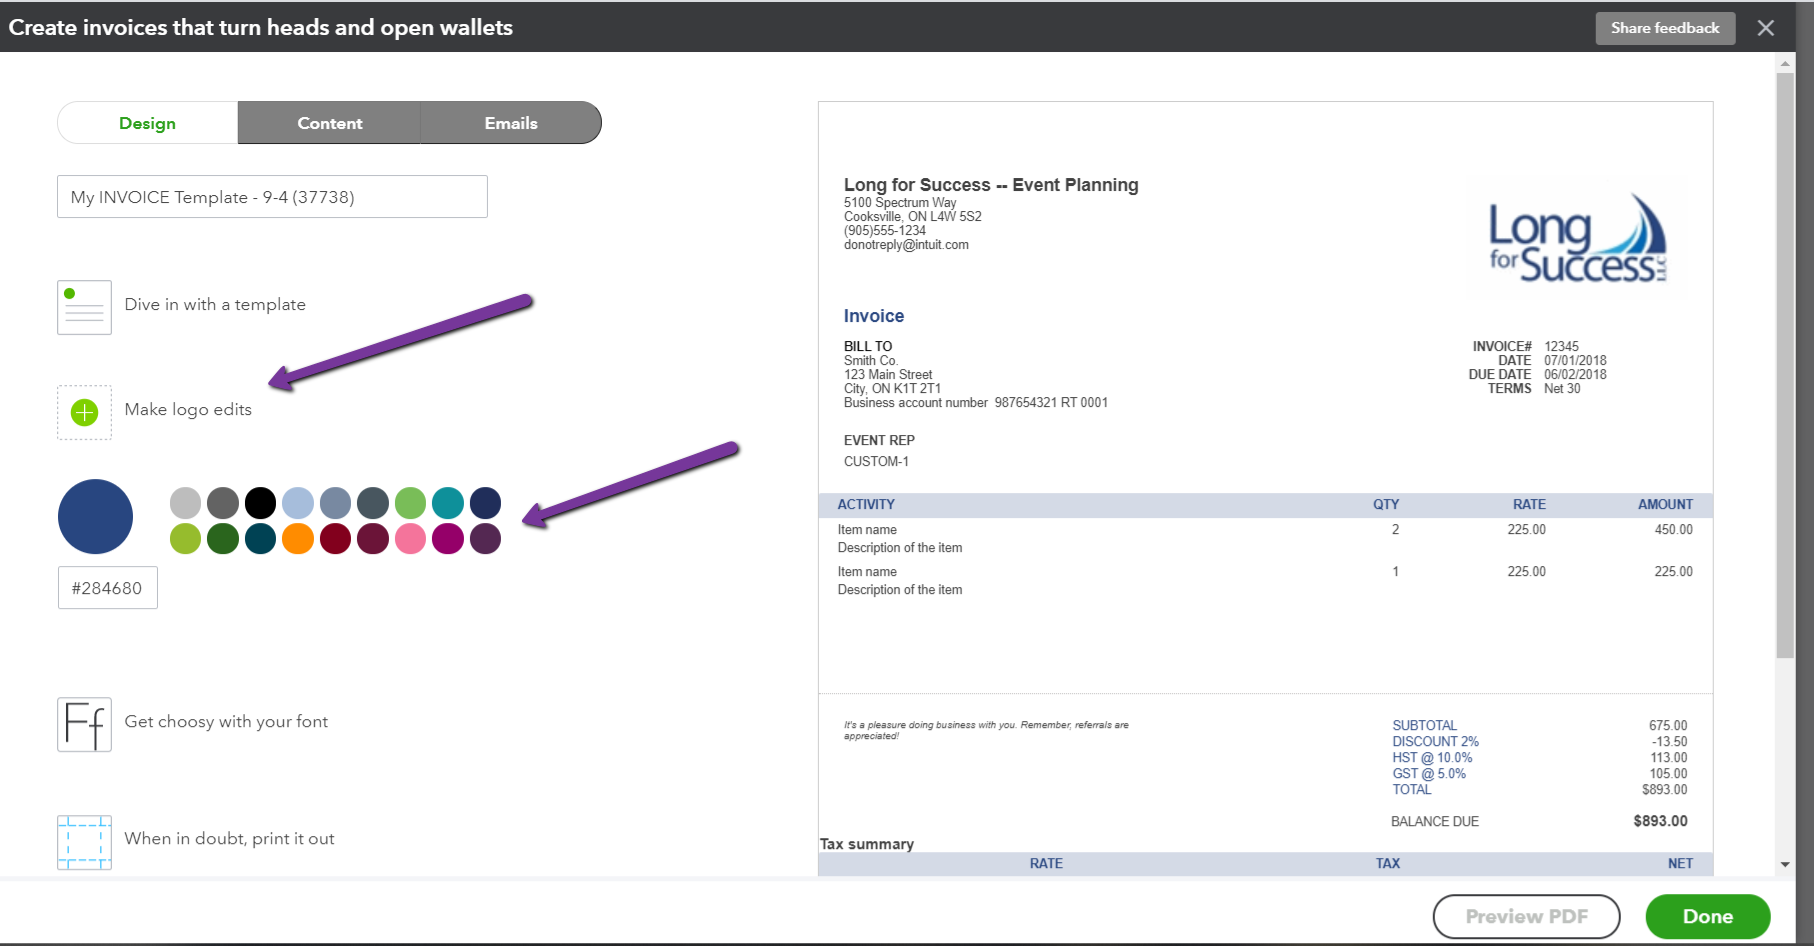
and even change what appears on your invoice!
You can have different invoices in QuickBooks Online for different types of sales or customers.
In this video I walk through the steps to help you design your invoices to reflect your business!
Hopefully after this your invoices are perfect!
If you would like assistance with this or anything else QuickBooks Online feel free to book a session with me. Here’s a link for a chat to see if I can help you.
Still need help?
Check this out.
Customizing Your QuickBooks Online Invoice Templates
You can customize the invoice templates in QuickBooks Online to match your business brand, to change the information you include, and to have different invoice template formats for different types of products and services.
Let's go!Still need help?
Book a session! We can work together to solve your specific QuickBooks Online questions.
Let's go!Video Transcript:
Hi! Kerry here from My Cloud Bookkeeping. Did you know that you can customize the invoices that you send to your customers and clients? You can have different logos, you can change the color scheme, different template options, you can even change what you include in the invoice so that you can show different details for different types of customers. Let’s have a look and I’ll show you how it’s done.
Here we are in the sample company. Let’s select invoicing at the top right here. You can see down the bottom here we have the option to customize. We’re going to choose New Style. Let’s name this Customized Invoice. Okay. Now the first option we have is to change up the template. Let’s have a look and see what the choices are. You can see as we select them here, they’re displayed on the right hand side. So we can go through decide what we like to look of the most. And for this example we’re gonna go with Fresh.
Now for the logo, as you can see the sample company logo is already in use here. You can select a different logo if you’re in your live file. You upload it and save it here. You can also change the size and the positioning of the logo. We can make it small. We can move it to the left, put in the middle, back to the right. Medium size. Back to large. On the left. Whatever you decide looks best for what you’re working with.
Now we can change the colors so that it ties in with whatever branding that you have probably with your logo. So try green. Here we have purple. All sorts of different options. Different green. Just play around and I actually kind of have a little bit of fun doing this and make sure you get it to look exactly how you’d like.
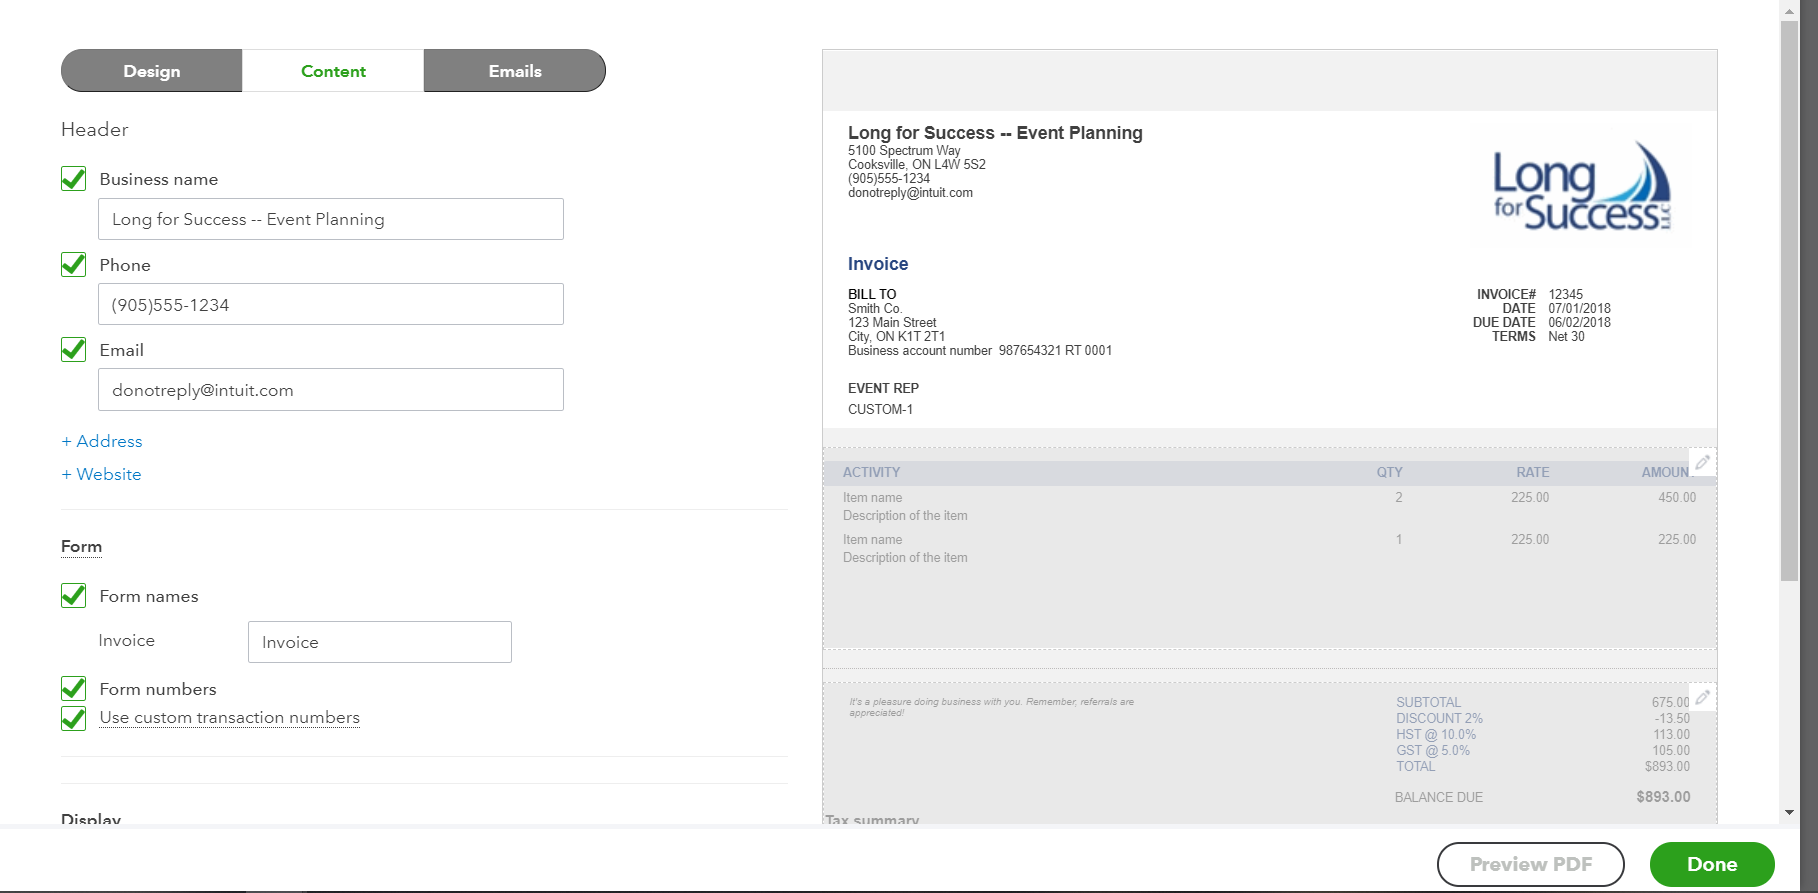
You can also change the font. So let’s see. Oh that looks hideous. Let’s go for Helvetica here and then we can increase the size. If you’re going to have a lot of information on your invoice, you probably don’t want it to be a larger font but you can make it look once again customize it. So the next option we have is for the content. This is split into three different sections. So we can choose the top section here. And have a look at the fields that appear. Have a look and see what fields show up as being available for this section.
We can select or deselect any of these that we want and it’ll change. Once again you can watch the changes just along as we do it. You can add custom fields so if you have information you’re tracking within your business’s sales cycle and you have custom fields set up, you can have them appear on your invoice as well.
Now the second third enables you to edit what you’re selling and the way that appears on the invoice. We can take away the quantity for example. We can add the tax rate, and also we have the option for some activity options. You may want to be showing activity by week and what employee carried out the work. Perhaps your billable expenses and you want to show a markup to tie in with a contract. Whatever is it that makes sense for your business, you choose that.
Now the bottom third is where you show the total and any messages to your clients. So we’re going to make a little change here so you can see what that looks like. Here we go. Let’s have a look. It shows up right here. We can see exactly what we’ve done. There’s also an option to put things at the bottom center. Bottom center information. Okay. It shows up down here.
They’ll be another video to follow up with GST/HST number. This is the box I’m referring to in that video when I say you can type it to appear down below. And we have the option to look at the standard emails. Now this is the email that would go out when you email the invoice to the customer. So here we go. “Here’s your invoice. We appreciate your prompt payment.” You might want to add something else in here. “It was great working with you.” I usually like to put their first name. I don’t like the full name. So you could just play around with that to get it to say whatever you’d like then there’s the reminder email. So if your clients haven’t paid you, you can send out the reminder and here’s the wording. You can write, “Please pay me quickly” or whatever you wanted to go in there would work.
The last option is the payments. This is for enabling your clients to pay through the QuickBooks payments program. That’s something you can set up from the cog as well. It’s if they pay by credit card. It’s actually usually very good rates. And you get paid quite quickly. It’s an efficient way to do that. But we won’t be doing that here. Once you’re happy with the design and the content of your invoice you can click done and that will be saved.
So let’s use this new template. So let’s grab Benjamin Yeung. Once again, sample company. So whatever we have in here is what I’m using. Here we go, 5,000. Make sure that we’re using customized invoice. I’m going to print or preview. Oh gosh I always get caught on that when I’m doing this. There we go. The tax rate.
Now we can print or preview. So we have that small logo. We have a different color. We have the large font. “Thanks for your business.” Blaring across there. We don’t have the quantity. We do have the rate. And then we have this bottom center information. Everything we customized is showing up here on this invoice.
So now, if we put in a fake email address. We can have a look and see what happens when we save and send to Benjamin. First name only. Oh misspelled it was great working with you. I must have done that wrong on the template. Don’t do that! And then you can just hit send and close. Of course it won’t send because we’re in the sample company. But that will save you time when you want to send out to your customers. You can create as many different templates as you want. You just rename them the different versions. You’re ready to go.
I hope you have fun with all those different options and design the perfect invoice for your business. If this was useful click like, subscribe to my channel. Also there’s a link below where you can sign up for a small business checklist to help you get your books.
If there’s anything else that you’d like to know about, please do send me a message, write in the comments below and my next video could be for you. Cheers!
Video Transcript:
Hi! Kerry here from My Cloud Bookkeeping. Did you know that you can customize the invoices that you send to your customers and clients? You can have different logos, you can change the color scheme, different template options, you can even change what you include in the invoice so that you can show different details for different types of customers. Let’s have a look and I’ll show you how it’s done.
Here we are in the sample company. Let’s select invoicing at the top right here. You can see down the bottom here we have the option to customize. We’re going to choose New Style. Let’s name this Customized Invoice. Okay. Now the first option we have is to change up the template. Let’s have a look and see what the choices are. You can see as we select them here, they’re displayed on the right hand side. So we can go through decide what we like to look of the most. And for this example we’re gonna go with Fresh.
Now for the logo, as you can see the sample company logo is already in use here. You can select a different logo if you’re in your live file. You upload it and save it here. You can also change the size and the positioning of the logo. We can make it small. We can move it to the left, put in the middle, back to the right. Medium size. Back to large. On the left. Whatever you decide looks best for what you’re working with.
Now we can change the colors so that it ties in with whatever branding that you have probably with your logo. So try green. Here we have purple. All sorts of different options. Different green. Just play around and I actually kind of have a little bit of fun doing this and make sure you get it to look exactly how you’d like.
You can also change the font. So let’s see. Oh that looks hideous. Let’s go for Helvetica here and then we can increase the size. If you’re going to have a lot of information on your invoice, you probably don’t want it to be a larger font but you can make it look once again customize it. So the next option we have is for the content. This is split into three different sections. So we can choose the top section here. And have a look at the fields that appear. Have a look and see what fields show up as being available for this section.
We can select or deselect any of these that we want and it’ll change. Once again you can watch the changes just along as we do it. You can add custom fields so if you have information you’re tracking within your business’s sales cycle and you have custom fields set up, you can have them appear on your invoice as well.
Now the second third enables you to edit what you’re selling and the way that appears on the invoice. We can take away the quantity for example. We can add the tax rate, and also we have the option for some activity options. You may want to be showing activity by week and what employee carried out the work. Perhaps your billable expenses and you want to show a markup to tie in with a contract. Whatever is it that makes sense for your business, you choose that.
Now the bottom third is where you show the total and any messages to your clients. So we’re going to make a little change here so you can see what that looks like. Here we go. Let’s have a look. It shows up right here. We can see exactly what we’ve done. There’s also an option to put things at the bottom center. Bottom center information. Okay. It shows up down here.
They’ll be another video to follow up with GST/HST number. This is the box I’m referring to in that video when I say you can type it to appear down below. And we have the option to look at the standard emails. Now this is the email that would go out when you email the invoice to the customer. So here we go. “Here’s your invoice. We appreciate your prompt payment.” You might want to add something else in here. “It was great working with you.” I usually like to put their first name. I don’t like the full name. So you could just play around with that to get it to say whatever you’d like then there’s the reminder email. So if your clients haven’t paid you, you can send out the reminder and here’s the wording. You can write, “Please pay me quickly” or whatever you wanted to go in there would work.
The last option is the payments. This is for enabling your clients to pay through the QuickBooks payments program. That’s something you can set up from the cog as well. It’s if they pay by credit card. It’s actually usually very good rates. And you get paid quite quickly. It’s an efficient way to do that. But we won’t be doing that here. Once you’re happy with the design and the content of your invoice you can click done and that will be saved.
So let’s use this new template. So let’s grab Benjamin Yeung. Once again, sample company. So whatever we have in here is what I’m using. Here we go, 5,000. Make sure that we’re using customized invoice. I’m going to print or preview. Oh gosh I always get caught on that when I’m doing this. There we go. The tax rate.
Now we can print or preview. So we have that small logo. We have a different color. We have the large font. “Thanks for your business.” Blaring across there. We don’t have the quantity. We do have the rate. And then we have this bottom center information. Everything we customized is showing up here on this invoice.
So now, if we put in a fake email address. We can have a look and see what happens when we save and send to Benjamin. First name only. Oh misspelled it was great working with you. I must have done that wrong on the template. Don’t do that! And then you can just hit send and close. Of course it won’t send because we’re in the sample company. But that will save you time when you want to send out to your customers. You can create as many different templates as you want. You just rename them the different versions. You’re ready to go.
I hope you have fun with all those different options and design the perfect invoice for your business. If this was useful click like, subscribe to my channel. Also there’s a link below where you can sign up for a small business checklist to help you get your books.
If there’s anything else that you’d like to know about, please do send me a message, write in the comments below and my next video could be for you. Cheers!
Still need help?
Check this out.
Customizing Your QuickBooks Online Invoice Templates
You can customize the invoice templates in QuickBooks Online to match your business brand, to change the information you include, and to have different invoice template formats for different types of products and services.
Let's go!Still need help?
We have what you need. Check out our courses and free resources to get more help managing your finances.
Let's go!