
How to Import Journal Entries into QuickBooks Online Using Excel or CSV
Importing journal entries into QuickBooks Online can save a significant amount of time, especially when you are working with year-end adjustments or bulk entries provided by your accountant. While journal entries should be used carefully, there are situations where importing them is the most efficient and accurate option.
In this guide, I’ll walk through how to properly prepare a CSV file, import journal entries into QuickBooks Online, and review them once they are in your file. This process works whether you are using Excel or Google Sheets and is especially useful for year-end cleanups, depreciation entries, or other accountant-provided adjustments.
When importing journal entries makes sense
Before diving into the how-to, it’s important to clarify when importing journal entries is appropriate. In QuickBooks Online, journal entries should not be part of your regular day-to-day bookkeeping. They can interfere with accounts receivable, accounts payable, and sales tax reporting if used incorrectly.
That said, importing journal entries can be helpful when:
- Your accountant provides multiple year-end or adjusting entries
- You need to enter depreciation, amortization, prepaid expenses, or deferred income
- You are migrating historical data into a file
- You want to reduce manual data entry errors
If you are unsure whether a journal entry is appropriate for your situation, I recommend reviewing guidance on when journal entries should and should not be used before proceeding.
Accessing the journal entry import feature in QuickBooks Online
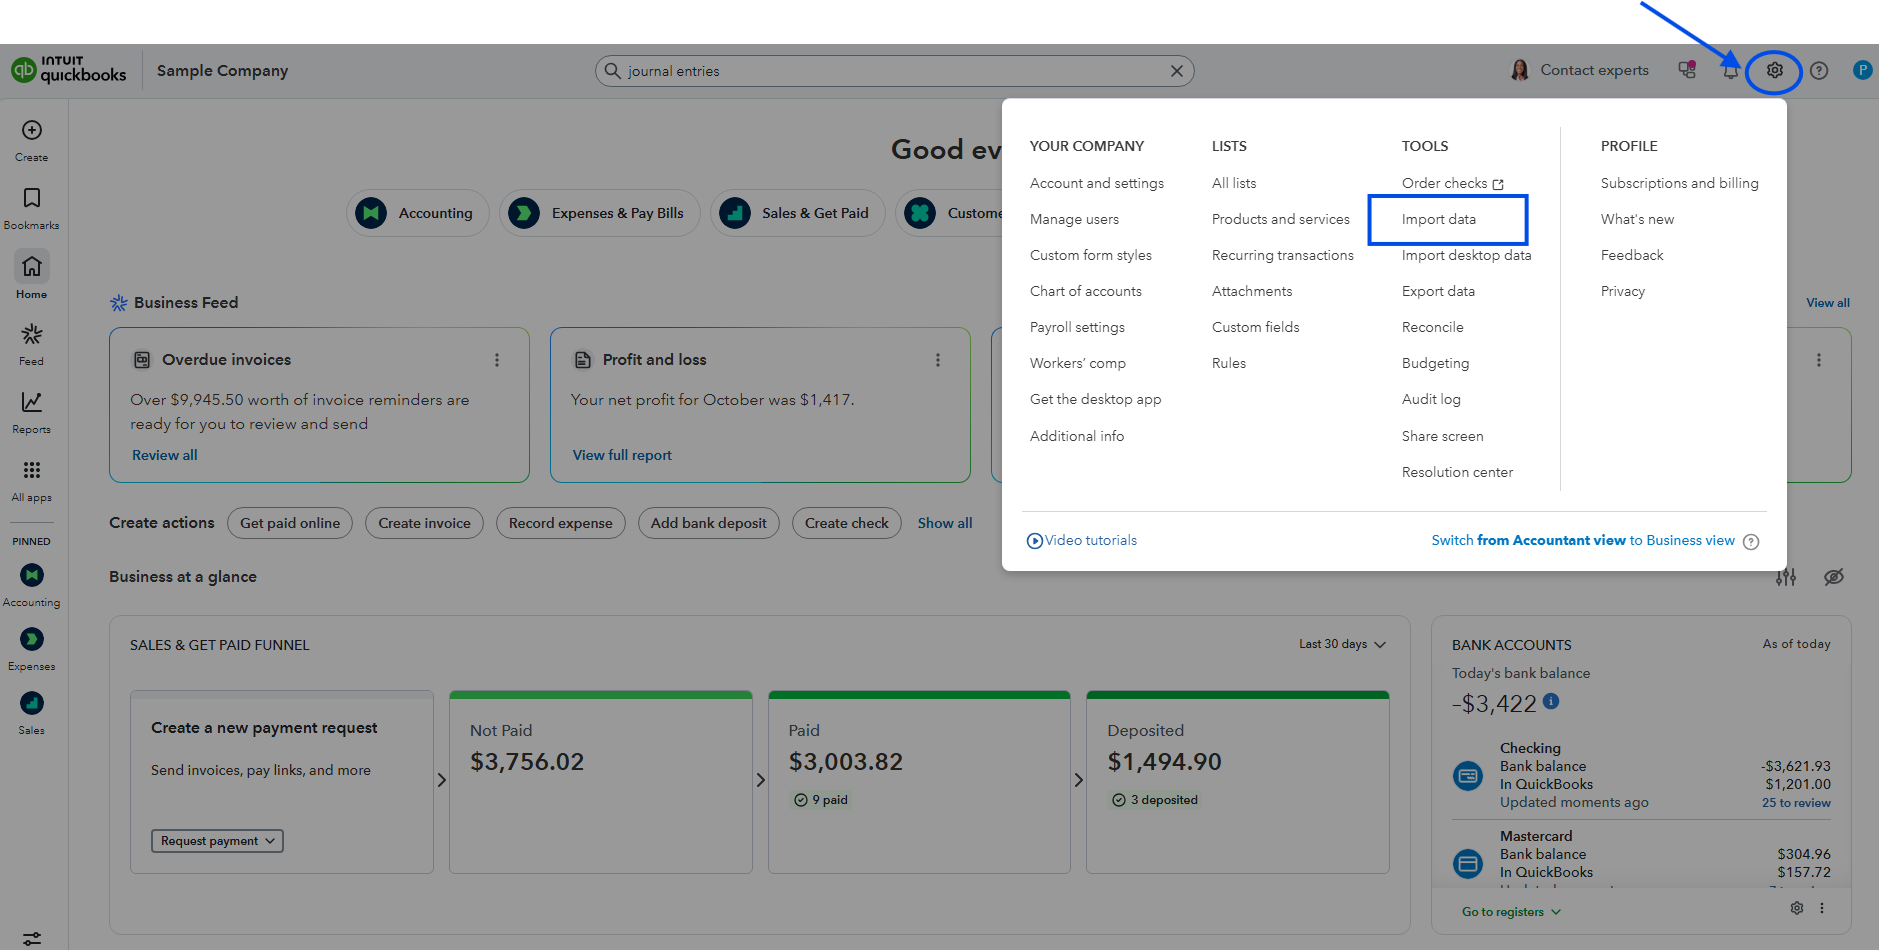
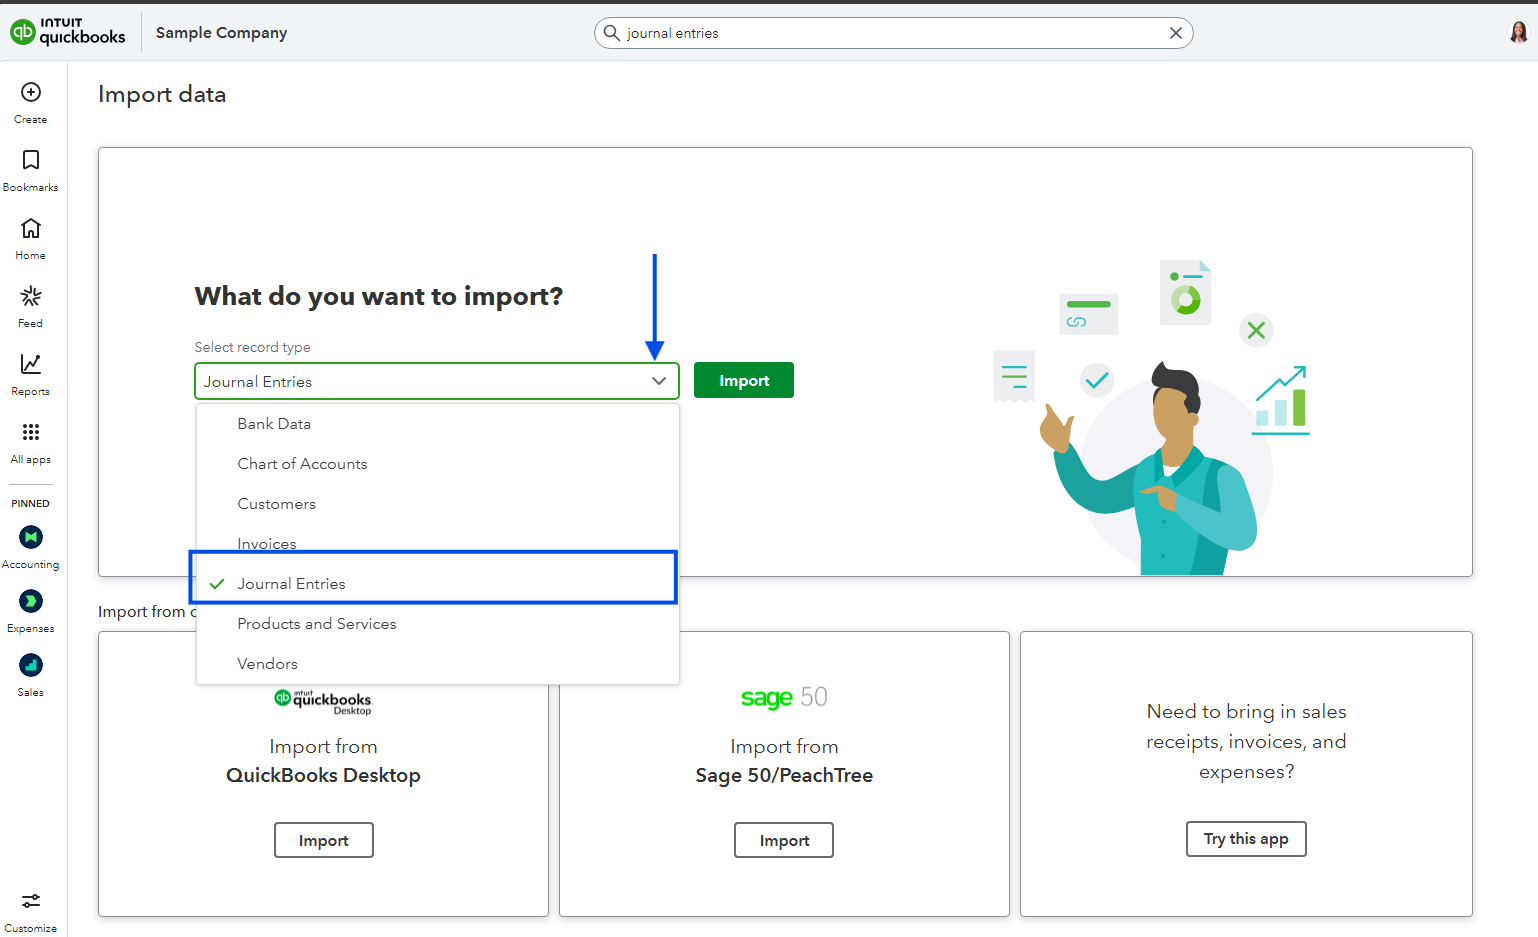
To begin, open your QuickBooks Online file and select the Gear icon in the top right corner. From there, choose Import data, then select Journal entries.
This takes you to the import workflow, where QuickBooks allows you to upload a CSV file and map it to the correct fields in your chart of accounts.
Downloading the sample CSV template
Before creating your own file, download the sample CSV file provided by QuickBooks. This template shows you the exact format QuickBooks expects and helps prevent common import errors.
Pay close attention to the column headers marked with an asterisk. These fields are required for the import to work correctly. Using the provided template significantly reduces formatting issues during the upload process.
Preparing your CSV file correctly
Once you open the sample CSV in Excel or Google Sheets, you can begin entering your journal entries. Each journal entry must share the same journal number across all related rows. This tells QuickBooks which lines belong together as a single entry.
You will also need to:
- Use the correct account names exactly as they appear in your Chart of Accounts
- Include parent and sub-account names if posting to sub-accounts
- Ensure total debits equal total credits for each journal entry
- Use valid dates and numeric values only
The memo field applies to the entire journal entry, while the description field applies to each individual line. Including clear descriptions makes future reviews and audits much easier.

Uploading and mapping the CSV file
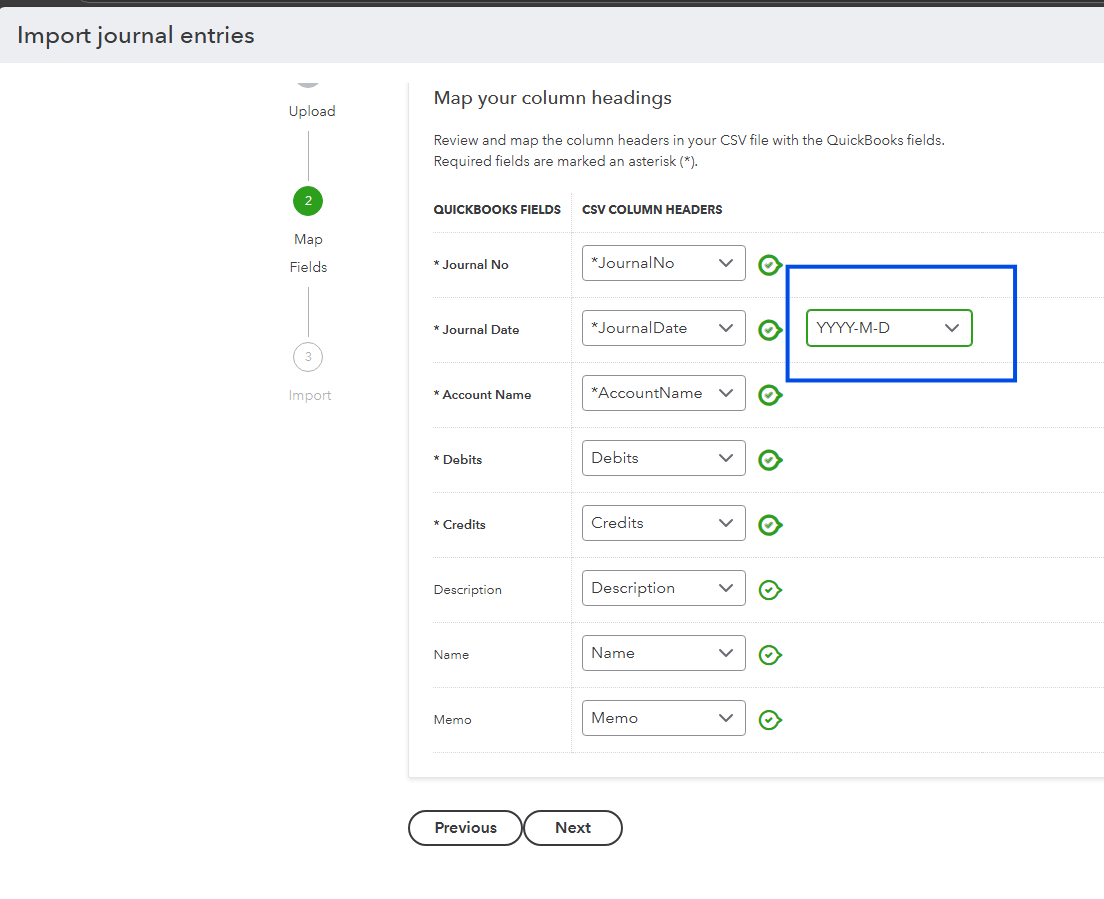
After saving your file in CSV format, return to the import screen in QuickBooks and upload the file. QuickBooks will prompt you to map each column in your spreadsheet to the correct QuickBooks field.
If you used the sample template without changing column headers, most fields should map automatically. Review date formats carefully, as incorrect date mapping is one of the most common causes of failed imports.
Once everything is mapped correctly, proceed to the next step and run the import.
Completing the import and confirming success
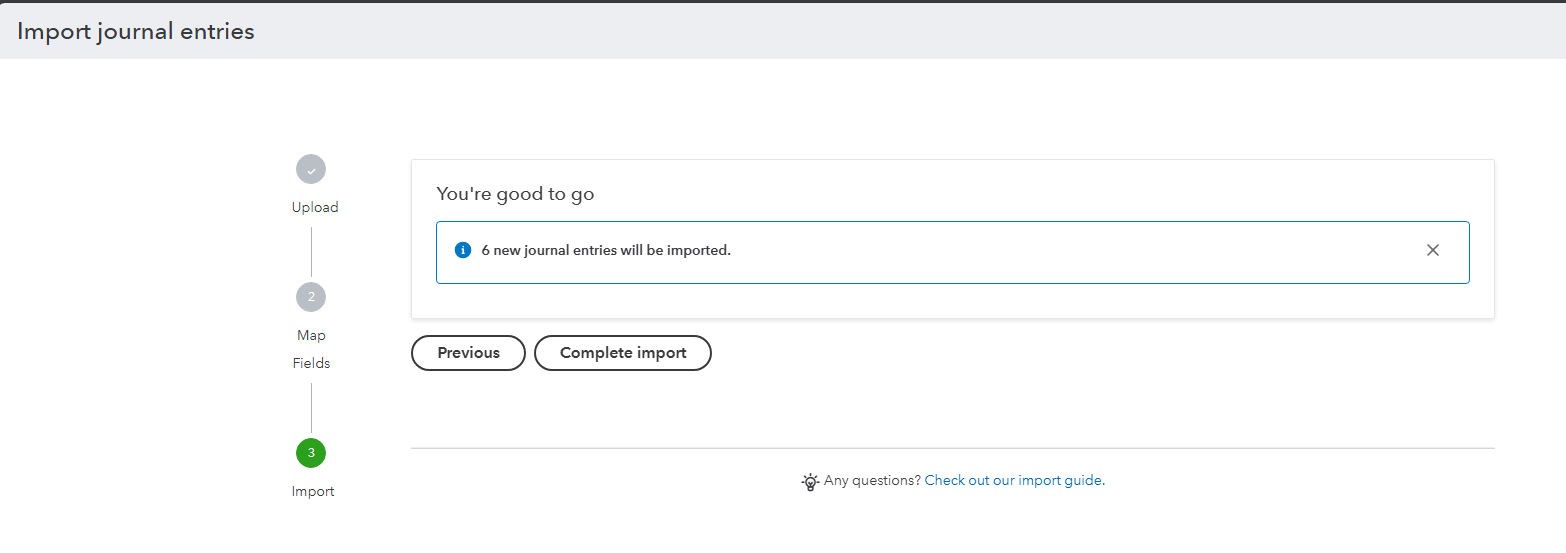
If the import is successful, QuickBooks will confirm that the journal entries have been added to your file. If errors occur, QuickBooks will usually indicate which row or field needs correction. Small issues such as account naming or sub-account formatting are common and easy to fix.
After the import completes, select Complete Import to finalize the process.
Reviewing imported journal entries in QuickBooks
To review the imported entries, open the Recent Transactions list using the clock icon in the top navigation. This is often the fastest way to locate newly imported journal entries.
Open a few entries to confirm:
- Dates are correct
- Accounts are accurate
- Debits and credits balance properly
- Descriptions and memos display as expected
Reviewing entries immediately after import helps catch errors before they affect financial reports.
Other data you can import into QuickBooks Online
While this guide focuses on journal entries, QuickBooks Online also allows you to import other data types such as:
- Chart of Accounts
- Customers and vendors
- Invoices and bills
- Bank transactions
Imports can be a powerful tool when setting up a new file or catching up on historical data, but they should always be reviewed carefully after completion.
Importing journal entries into QuickBooks Online is a practical solution when used intentionally and with care. By working from the QuickBooks template, double-checking account names, and reviewing entries after import, you can save time without compromising the accuracy of your financial records.
If you regularly receive journal entries from your accountant at year-end, this workflow can make the process faster, cleaner, and far less frustrating.
Helpful resources
Compare QuickBooks Online plans
https://www.mycloudbookkeeping.org/quickbooks-plan-comparison
Download the Small Business Month-End Checklist
https://learn.mycloudbookkeeping.org/small-business-month-end-checklist
Book a free consultation
https://www.mycloudbookkeeping.org/consultation
If you have questions about journal entries or importing data into QuickBooks Online, feel free to reach out or leave a comment. I’m always happy to help you make sense of your numbers.
Still need help?
Check this out.
Let's go!Still need help?
Book a session! We can work together to solve your specific QuickBooks Online questions.
Let's go!Hi, Kerry here from My Cloud Bookkeeping. I work with small businesses and entrepreneurs to help them manage their business finances in QuickBooks Online.
There is a feature in QuickBooks that enables you to import a large quantity of data directly from a CSV file that you can create from either Excel or Google Sheets. In today’s example, we’re going to look at journal entries.
If you’ve watched any of my other videos, you’ll know that I generally discourage using journal entries in QuickBooks Online. They can mess up accounts receivable, accounts payable, sales taxes, and other areas if they’re used incorrectly. That said, there are a few situations where a journal entry really is the best option. If you’re not sure when that applies, check out my video on journal entry hacks where I explain those scenarios.
Today, I’m going to show you how to create and import journal entries using a CSV file.
We’ll start by going up to the Gear icon in the sample company. From there, we select Import data and then choose Journal entries. Once we click Import, the first thing I always do is download the sample CSV file. I do this every single time because it shows exactly what format QuickBooks expects.
If you work with the format QuickBooks provides, you’re much more likely to have a smooth import.
When you open the sample CSV file, pay close attention to the columns that have an asterisk. Those fields are required for the import to work. Of course, the debit and credit amounts are also essential.
I’ve used this template to create an import file with the year-end journal entries I received from my accountant. In many cases, accountants provide these as PDFs, so I’ve typed the entries into the spreadsheet manually.
The first column is the journal number. You’ll notice that each journal entry has the same number across multiple rows. This tells QuickBooks which rows belong to the same journal entry. For simplicity, each example here only has two rows, but if your journal entry has three or four rows, they should all share the same journal number.
Next is the journal date. These dates don’t all need to be the same. You can use whatever date is appropriate for each journal entry.
The account name column refers to the category from your Chart of Accounts. If you’re using sub-accounts, you’ll need to include both the parent account and the sub-account name, separated by colons. This is one of the most common areas where imports fail, so it’s worth double-checking.
The memo field applies to the entire journal entry, while the description field applies to each individual line. The description will show up when you view transactions within reports or the Chart of Accounts, so it’s helpful to be specific.
Debits and credits must balance for each journal entry. I’m not including taxes, classes, or locations in this example, but those fields can be used if they’re relevant to the journal entry you’re importing.
Once the file is ready, save it somewhere easy to find, such as your desktop.
Back in QuickBooks, click Browse, select the CSV file, and upload it. Then click Next.
On the mapping screen, make sure each column from your spreadsheet is mapped correctly to the corresponding QuickBooks field. If you used the sample template without changing headers, this step should be straightforward. Also confirm that the date format is correct.
Once everything looks good, click Next again and run the import. Sometimes it works on the first try, and sometimes you need to make a few small adjustments. That’s normal. Even with a bit of troubleshooting, importing is usually much faster than entering journal entries manually.
When the import completes, click Complete Import.
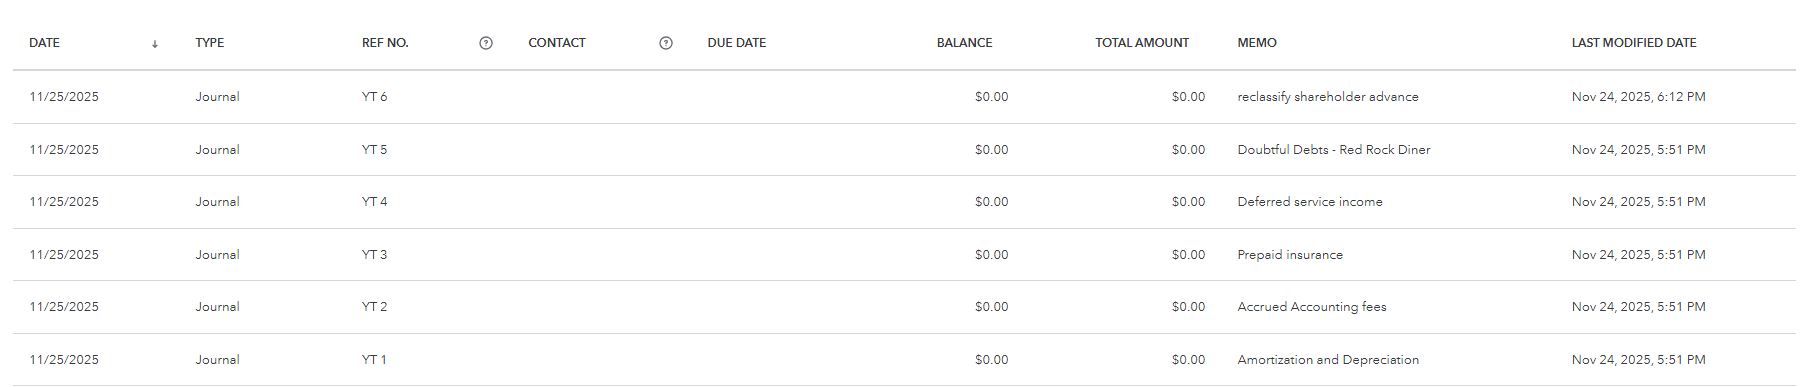
To review the imported journal entries, go to the clock icon at the top of QuickBooks to view recent transactions. You’ll see the journal entries listed there. Open a few to confirm the dates, accounts, debits, credits, and descriptions are correct.
You’ll notice that the journal numbers, memos, and line descriptions all carried through from the CSV file, which makes reviewing and auditing much easier.
Importing data like this can be a huge time saver. I focused on journal entries today, but QuickBooks also allows you to import other data such as bank transactions, your chart of accounts, customer lists, invoices, and more.
Anytime you have a large volume of data to enter, importing can be a great option as long as it’s done carefully.
I hope this helps with those year-end journal entries from your accountant and gives you a better idea of what’s possible with imports in QuickBooks Online. If there’s anything else you’d like to learn about, please leave a comment below. I’d love to hear from you.
Be sure to like and subscribe, and I’ll see you in the next video. Cheers.
Hi, Kerry here from My Cloud Bookkeeping. I work with small businesses and entrepreneurs to help them manage their business finances in QuickBooks Online.
There is a feature in QuickBooks that enables you to import a large quantity of data directly from a CSV file that you can create from either Excel or Google Sheets. In today’s example, we’re going to look at journal entries.
If you’ve watched any of my other videos, you’ll know that I generally discourage using journal entries in QuickBooks Online. They can mess up accounts receivable, accounts payable, sales taxes, and other areas if they’re used incorrectly. That said, there are a few situations where a journal entry really is the best option. If you’re not sure when that applies, check out my video on journal entry hacks where I explain those scenarios.
Today, I’m going to show you how to create and import journal entries using a CSV file.
We’ll start by going up to the Gear icon in the sample company. From there, we select Import data and then choose Journal entries. Once we click Import, the first thing I always do is download the sample CSV file. I do this every single time because it shows exactly what format QuickBooks expects.
If you work with the format QuickBooks provides, you’re much more likely to have a smooth import.
When you open the sample CSV file, pay close attention to the columns that have an asterisk. Those fields are required for the import to work. Of course, the debit and credit amounts are also essential.
I’ve used this template to create an import file with the year-end journal entries I received from my accountant. In many cases, accountants provide these as PDFs, so I’ve typed the entries into the spreadsheet manually.
The first column is the journal number. You’ll notice that each journal entry has the same number across multiple rows. This tells QuickBooks which rows belong to the same journal entry. For simplicity, each example here only has two rows, but if your journal entry has three or four rows, they should all share the same journal number.
Next is the journal date. These dates don’t all need to be the same. You can use whatever date is appropriate for each journal entry.
The account name column refers to the category from your Chart of Accounts. If you’re using sub-accounts, you’ll need to include both the parent account and the sub-account name, separated by colons. This is one of the most common areas where imports fail, so it’s worth double-checking.
The memo field applies to the entire journal entry, while the description field applies to each individual line. The description will show up when you view transactions within reports or the Chart of Accounts, so it’s helpful to be specific.
Debits and credits must balance for each journal entry. I’m not including taxes, classes, or locations in this example, but those fields can be used if they’re relevant to the journal entry you’re importing.
Once the file is ready, save it somewhere easy to find, such as your desktop.
Back in QuickBooks, click Browse, select the CSV file, and upload it. Then click Next.
On the mapping screen, make sure each column from your spreadsheet is mapped correctly to the corresponding QuickBooks field. If you used the sample template without changing headers, this step should be straightforward. Also confirm that the date format is correct.
Once everything looks good, click Next again and run the import. Sometimes it works on the first try, and sometimes you need to make a few small adjustments. That’s normal. Even with a bit of troubleshooting, importing is usually much faster than entering journal entries manually.
When the import completes, click Complete Import.
To review the imported journal entries, go to the clock icon at the top of QuickBooks to view recent transactions. You’ll see the journal entries listed there. Open a few to confirm the dates, accounts, debits, credits, and descriptions are correct.
You’ll notice that the journal numbers, memos, and line descriptions all carried through from the CSV file, which makes reviewing and auditing much easier.
Importing data like this can be a huge time saver. I focused on journal entries today, but QuickBooks also allows you to import other data such as bank transactions, your chart of accounts, customer lists, invoices, and more.
Anytime you have a large volume of data to enter, importing can be a great option as long as it’s done carefully.
I hope this helps with those year-end journal entries from your accountant and gives you a better idea of what’s possible with imports in QuickBooks Online. If there’s anything else you’d like to learn about, please leave a comment below. I’d love to hear from you.
Be sure to like and subscribe, and I’ll see you in the next video. Cheers.
Still need help?
Check this out.
Let's go!Still need help?
We have what you need. Check out our courses and free resources to get more help managing your finances.
Let's go!