
How to Set Up and Use Classes in QuickBooks Online
If you have ever wished you could see exactly how different parts of your business are performing, Class Tracking in QuickBooks Online can be an incredibly powerful tool. Many business owners and bookkeepers are not aware that this feature exists or how much insight it can provide. Whether you manage multiple rental properties, run programs in a nonprofit, operate different locations or divisions, or simply need more clarity in your numbers, turning on classes can help you separate income and expenses in a meaningful way.
In this guide, I’ll walk you through how to turn on Class Tracking, set up and manage your class list and start using classes in your daily transactions. We’ll look at how to assign classes from the bank feed, how to split a single transaction across multiple classes and how to run reports like a Profit and Loss by Class so you can actually see the difference this makes. You’ll also learn how to build simple management reports that give the right people better visibility into the parts of the business they oversee.
What are Classes in QuickBooks Online
Classes allow you to separate your financial activity into meaningful categories. Unlike Locations, which apply to an entire transaction, classes can be applied line by line. This flexibility means you can split a single bill or payment across several business units, funding streams, regions or rental properties.
Some examples of when classes are helpful include:
• Tracking income and expenses for each rental property
• Managing different programs or funding sources in a nonprofit
• Separating revenue and costs by location or division
• Providing tailored reports to team members responsible for certain areas
The purpose is simple: when you assign classes correctly, your reports become much more informative and decision-making becomes easier.
How to Turn on Class Tracking in QuickBooks Online
To enable class tracking, open the gear icon at the top right of QuickBooks Online and select Account and Settings. Navigate to the Advanced tab and scroll down until you see the option to track classes. Once you toggle this on, you can also choose whether QuickBooks should warn you when a transaction does not have a class assigned. This is helpful if every transaction in your workflow should carry a class.
Once class tracking is enabled, you can find and edit your class list by selecting All Lists and then Classes. This is where you can create new classes or rename existing ones. In the sample company, classes such as Admin, East, North, South and West are already set up. You can add anything you need, such as Warehouse or separate project names.
Assigning Classes to Your Transactions
Once classes are active, you can begin using them in your day-to-day transactions.
If you are entering a bill manually, you can assign a class to each row. This is helpful when a single vendor bill needs to be split across multiple departments or locations. For example, you might buy supplies in bulk and distribute those costs across several divisions. Simply add multiple lines to the bill, assign the correct class on each line and save.
If you are using the bank feed, you can enable the class column by selecting the small gear icon above the transactions list. This allows you to assign a class directly as you categorize each bank transaction. You can also split a transaction into several rows and assign each portion to a different class. For instance, a freight charge may need to be divided between multiple regions. Expanding the row, selecting Split and entering separate amounts ensures that each class receives its portion of the expense.
For income, you can assign a class directly on invoices. Whether you are selling services or allocating grant revenue, using classes helps you understand where your income is coming from and how it aligns with related expenses.
Running a Profit and Loss by Class Report
Once you have recorded some class activity, you can run a Profit and Loss by Class report to see the results. You will find this report under the Reports section. Each class will appear as its own column, giving you a side-by-side comparison of profitability across the areas you are tracking.
If you prefer to share a report for only one area, you can filter the report to show a single class. This is especially useful for nonprofits, multi-location businesses or teams responsible for specific cost centers. After customizing the report, you can save it under Custom Reports for easy access in the future.
Creating Management Reports with Classes
One of the most helpful but underused features in QuickBooks is the ability to add your custom reports into a Management Report package. If you regularly send monthly updates to different team members or board committees, this can save you a lot of time. You can pull your reports together, add a cover page and create a tidy, professional-looking packet without leaving QuickBooks. It’s an easy way to share clear financial information with the people who need it.
Why Classes Make Your Reports More Useful
Using classes is really about giving yourself clarity. You already spend time entering your transactions, so adding this one small step helps that effort work harder for you. Classes turn a long list of income and expenses into information you can actually use. Instead of wondering which parts of your business are carrying their weight or costing you more than you expected, you can see the story in your numbers right away.
And if you’ve discovered a creative or unexpected way to use class tracking in your business or nonprofit, I’d truly love to hear about it. Your ideas often inspire future videos and help other business owners too. Leave a comment or reach out through my website anytime.
Helpful Resources
Compare QuickBooks Online Plans:
https://www.mycloudbookkeeping.org/quickbooks-online-plan-comparison
Download your free Month-End Checklist for Small Business:
https://learn.mycloudbookkeeping.org/month-end-checklist
Book a free consultation:
https://www.mycloudbookkeeping.org/consultation
Still need help?
Check this out.
Let's go!Still need help?
Book a session! We can work together to solve your specific QuickBooks Online questions.
Let's go!Hi, Kerry here from My Cloud Bookkeeping. I work with small businesses and entrepreneurs helping them manage their business finances in QuickBooks Online. You may have seen that there’s an option to turn on classes in QuickBooks, or perhaps you’ve heard people talking about classes and wondered what that means. It’s a way to separate your income and expenses into different categories. For example, if you own multiple rental properties, you can create a class for each property. If you’re a nonprofit doing fund accounting, each fund can be its own class. Or maybe you simply want to track by different locations or divisions. It’s a helpful way to get a clearer picture of where your money is coming from and where it’s going.
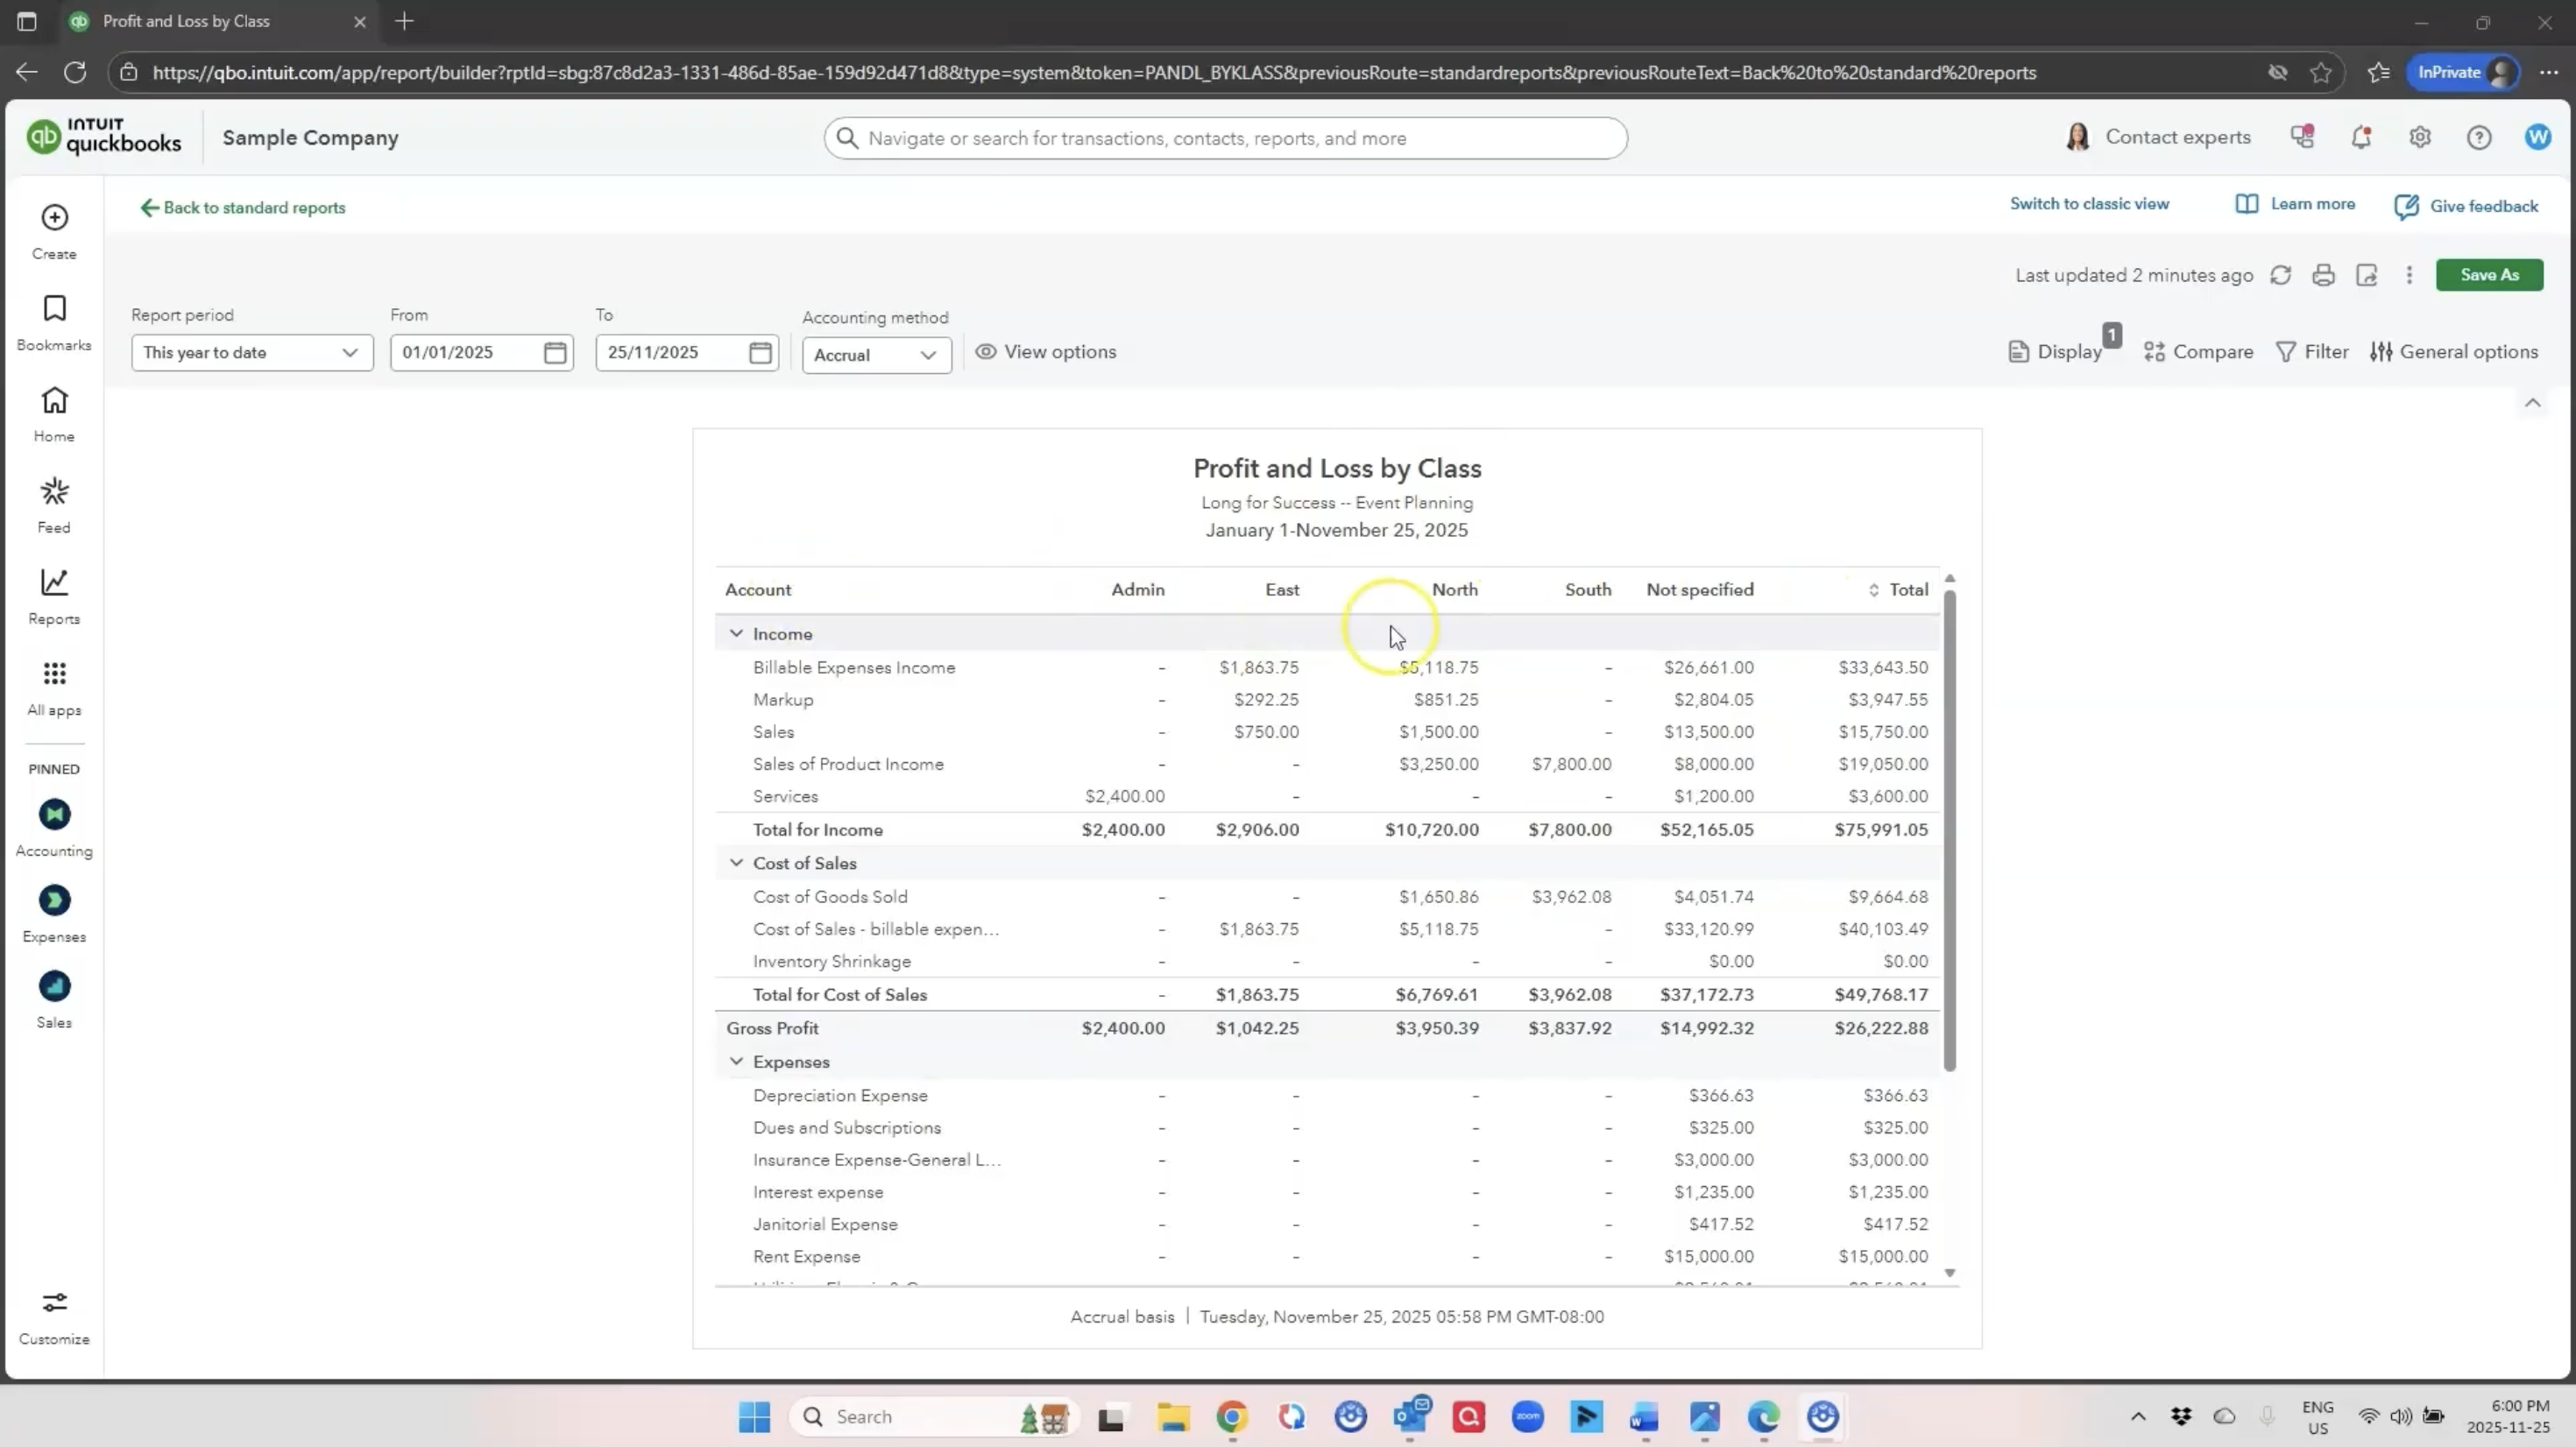
Here in the sample company, I’ve opened a Profit and Loss by Class report so you can see the benefit of viewing your information across different columns. Typically, when you look at a Profit and Loss Statement, you only see totals. But with classes, you can break things apart. In this example, you’ll see admin, east, north, south, west and an unspecified column, which is common in a sample company.
I’ll show you how to turn on classes, how to name them and then how to record transactions using those classes. To turn classes on, open the gear icon and go to Account and Settings, then Advanced. Under Categories, you’ll see the option to track classes. You can also ask QuickBooks to warn you when a transaction doesn’t have a class, which is helpful if everything should be classified.
One major benefit of classes is that you can assign a class to each line in a transaction, not just the whole transaction. For example, you can split a bill between multiple classes if it relates to more than one area of your business.
Once classes are turned on, go to All Lists and then Classes to create or rename them. The sample company already has several, but I’ll add a new one called Warehouse. Now that it’s created, you’ll see it show up in your class list and you can assign transactions to it.
Let’s look at how to use classes when entering transactions. When I create a bill, I can enter one line for supplies for the admin class, another for the warehouse and another for west. When I save the bill, all of those class allocations flow into the Profit and Loss by Class report.
You can also assign classes from the bank feed. Open the gear icon in the bank feed and enable the class column. Then, when categorizing transactions, you can assign them directly. If you need to split a transaction across more than one class, click to expand the row and choose Split. Allocate each amount to the appropriate class and add it.
You can also assign classes on invoices. When creating an invoice, simply choose the appropriate class for each line. If needed, you can split income across classes by adding more than one line.
Once you’ve added transactions, go back to your Profit and Loss by Class report to see how everything flows through. You’ll see expenses and income assigned to each class. You can also create a filtered report for only one class. For example, if you want a Profit and Loss just for the North region, filter by class and save the customized report. You can rename it, save it to your custom reports and even add it directly to a Management Report package.
The Management Report feature is incredibly useful if you prepare monthly packages for different managers or departments. It allows you to include a cover page, table of contents and multiple reports in one organized PDF.
Using classes gives you more visibility into your financial information and helps you make better decisions. After all the work of entering your data, taking a few extra seconds to assign a class can make your reports far more meaningful. If you’ve found interesting ways to use classes, I’d love to hear them—leave a comment below. Be sure to subscribe, and I’ll see you in the next video. Cheers.
Hi, Kerry here from My Cloud Bookkeeping. I work with small businesses and entrepreneurs helping them manage their business finances in QuickBooks Online. You may have seen that there’s an option to turn on classes in QuickBooks, or perhaps you’ve heard people talking about classes and wondered what that means. It’s a way to separate your income and expenses into different categories. For example, if you own multiple rental properties, you can create a class for each property. If you’re a nonprofit doing fund accounting, each fund can be its own class. Or maybe you simply want to track by different locations or divisions. It’s a helpful way to get a clearer picture of where your money is coming from and where it’s going.
Here in the sample company, I’ve opened a Profit and Loss by Class report so you can see the benefit of viewing your information across different columns. Typically, when you look at a Profit and Loss Statement, you only see totals. But with classes, you can break things apart. In this example, you’ll see admin, east, north, south, west and an unspecified column, which is common in a sample company.
I’ll show you how to turn on classes, how to name them and then how to record transactions using those classes. To turn classes on, open the gear icon and go to Account and Settings, then Advanced. Under Categories, you’ll see the option to track classes. You can also ask QuickBooks to warn you when a transaction doesn’t have a class, which is helpful if everything should be classified.
One major benefit of classes is that you can assign a class to each line in a transaction, not just the whole transaction. For example, you can split a bill between multiple classes if it relates to more than one area of your business.
Once classes are turned on, go to All Lists and then Classes to create or rename them. The sample company already has several, but I’ll add a new one called Warehouse. Now that it’s created, you’ll see it show up in your class list and you can assign transactions to it.
Let’s look at how to use classes when entering transactions. When I create a bill, I can enter one line for supplies for the admin class, another for the warehouse and another for west. When I save the bill, all of those class allocations flow into the Profit and Loss by Class report.
You can also assign classes from the bank feed. Open the gear icon in the bank feed and enable the class column. Then, when categorizing transactions, you can assign them directly. If you need to split a transaction across more than one class, click to expand the row and choose Split. Allocate each amount to the appropriate class and add it.
You can also assign classes on invoices. When creating an invoice, simply choose the appropriate class for each line. If needed, you can split income across classes by adding more than one line.
Once you’ve added transactions, go back to your Profit and Loss by Class report to see how everything flows through. You’ll see expenses and income assigned to each class. You can also create a filtered report for only one class. For example, if you want a Profit and Loss just for the North region, filter by class and save the customized report. You can rename it, save it to your custom reports and even add it directly to a Management Report package.
The Management Report feature is incredibly useful if you prepare monthly packages for different managers or departments. It allows you to include a cover page, table of contents and multiple reports in one organized PDF.
Using classes gives you more visibility into your financial information and helps you make better decisions. After all the work of entering your data, taking a few extra seconds to assign a class can make your reports far more meaningful. If you’ve found interesting ways to use classes, I’d love to hear them—leave a comment below. Be sure to subscribe, and I’ll see you in the next video. Cheers.
Still need help?
Check this out.
Let's go!Still need help?
We have what you need. Check out our courses and free resources to get more help managing your finances.
Let's go!